这是一个基于 Hexo 7.3.0 ,Hutterfly 5.3.5 ,macOS Sequoia 15.5 的博客配置教程。
之前 lucky 用的是 Matery 主题,但是由于换了新设备,导致数据损坏,所以便有了这篇文章。
1、网站基本信息 除了此处修改的是 Hexo 配置文件 _config.yml,后面的都是修改 Butterfly 主题配置文件 _config.butterfly.yml
1
2
3
4
5
6
7
title: 网站标题 subtitle: 网站副标题 description: 网站描述 keywords: 网站关键字1,网站关键字2,网站关键字3 author: 站点作者 language: zh-CN timezone: Asia/Shanghai
2、导航栏配置 修改主题配置文件 _config.butterfly.yml 文件
1
2
3
4
5
6
7
nav: logo: display_title: true fixed: false
3、顶部目录配置 Butterfly 支持引用 font-awesome v6 图标
1
2
3
4
5
6
7
8
menu: 主页: / || fas fa-home 归档: /archives/ || fa fa-folder-open 分类: /categories/ || fa fa-archive 标签: /tags/ || fa fa-tags 友链: /link/ || fa fa-link 留言: /comment/ || fa fa-paper-plane 关于: /about/ || fas fa-user
对于不存在的目录需要自己新建,例如
4、网站首页配置 4.1、文章卡片布局 文章封面制作网站推荐:https://nav.rdonly.com/laboratory/bgimage/backimage.html
4.2、主页文章节选 1 2 3 4 5 6 7 8 index_post_content: method: 1 length: 500
5、代码高亮配置 1 2 3 4 5 6 7 8 9 10 11 12 13 14 15 16 17 18 19 20 code_blocks: theme: pale night macStyle: true height_limit: 450 word_wrap: false copy: true language: true shrink: false fullpage: false
6、社交图标配置 Butterfly 支持引用 font-awesome v6 图标
1 2 3 4 5 social: fas fa-rss: atom.xml || RSS || '#1d5ddd' fas fa-envelope: mailto:[email protected] || Email || '#4a7dbe' fab fa-bilibili: https://space.bilibili.com/xxxx || bilibili || '#FB7299' fab fa-github: https://github.com/xxx || Github || '#2fdd1d'
7、各种图片配置 7.1、头像 1 2 3 4 5 6 favicon: /img/title.icon avatar: img: /img/avatar.png effect: true
7.2、页脚背景图 1 2 footer_img: 'linear-gradient(20deg, #0062be, #925696, #cc426e, #fb0347)'
7.3、网页背景图 1 2 3 4 5 6 7 8 9 10 11 12 13 14 15 16 17 background: 'linear-gradient(20deg, #0062be, #925696, #cc426e, #fb0347)' canvas_ribbon: enable: true size: 150 alpha: 0.6 zIndex: -1 click_to_change: false mobile: false
8、文章信息展示 1 2 3 4 5 6 7 8 9 10 11 12 13 14 15 16 17 18 19 20 21 post_meta: page: date_type: both date_format: date categories: true tags: true label: true post: position: left date_type: both date_format: date categories: true tags: true label: true
9、侧边栏功能配置 1 2 3 4 5 6 7 8 9 10 11 12 13 14 15 16 17 18 19 20 21 22 23 24 25 26 27 28 29 30 31 32 33 34 35 36 37 38 39 40 41 42 43 44 45 46 47 48 49 50 51 52 53 54 55 56 57 58 59 60 61 62 63 64 65 66 67 68 69 70 71 72 73 74 75 76 77 78 79 80 81 82 83 84 85 86 87 88 89 90 91 92 93 94 95 96 97 98 aside: enable: true hide: false button: true mobile: true position: right display: archive: true tag: true category: true card_author: enable: true description: button: enable: false icon: fab fa-github text: Follow Me link: https://github.com/xxxxxx card_announcement: enable: false content: 公告内容 card_recent_post: enable: true limit: 5 sort: date sort_order: card_newest_comments: enable: false sort_order: limit: 6 storage: 10 avatar: true card_categories: enable: true limit: 8 expand: none sort_order: card_tags: enable: true limit: 40 color: true orderby: random order: 1 sort_order: card_archives: enable: true type: monthly format: MMMM YYYY order: -1 limit: 5 sort_order: card_post_series: enable: true series_title: true orderBy: 'date' order: -1 card_webinfo: enable: true post_count: true last_push_date: true sort_order: runtime_date: Year/Month/Day
10、复制相关配置 1 2 3 4 5 6 7 8 copy: enable: true copyright: enable: false limit_count: 150
10、评论功能配置 笔者这里选择的是 Twikoo 评论系统进行部署配置,具体操作详见:使用 Netlify 云函数部署
1 2 3 4 5 6 7 8 9 10 11 12 13 14 15 16 17 18 19 comments: use: Twikoo text: true azyload: true count: true card_post_count: false twikoo: envId: http://xxxx/.netlify/functions/twikoo region: visitor: false option:
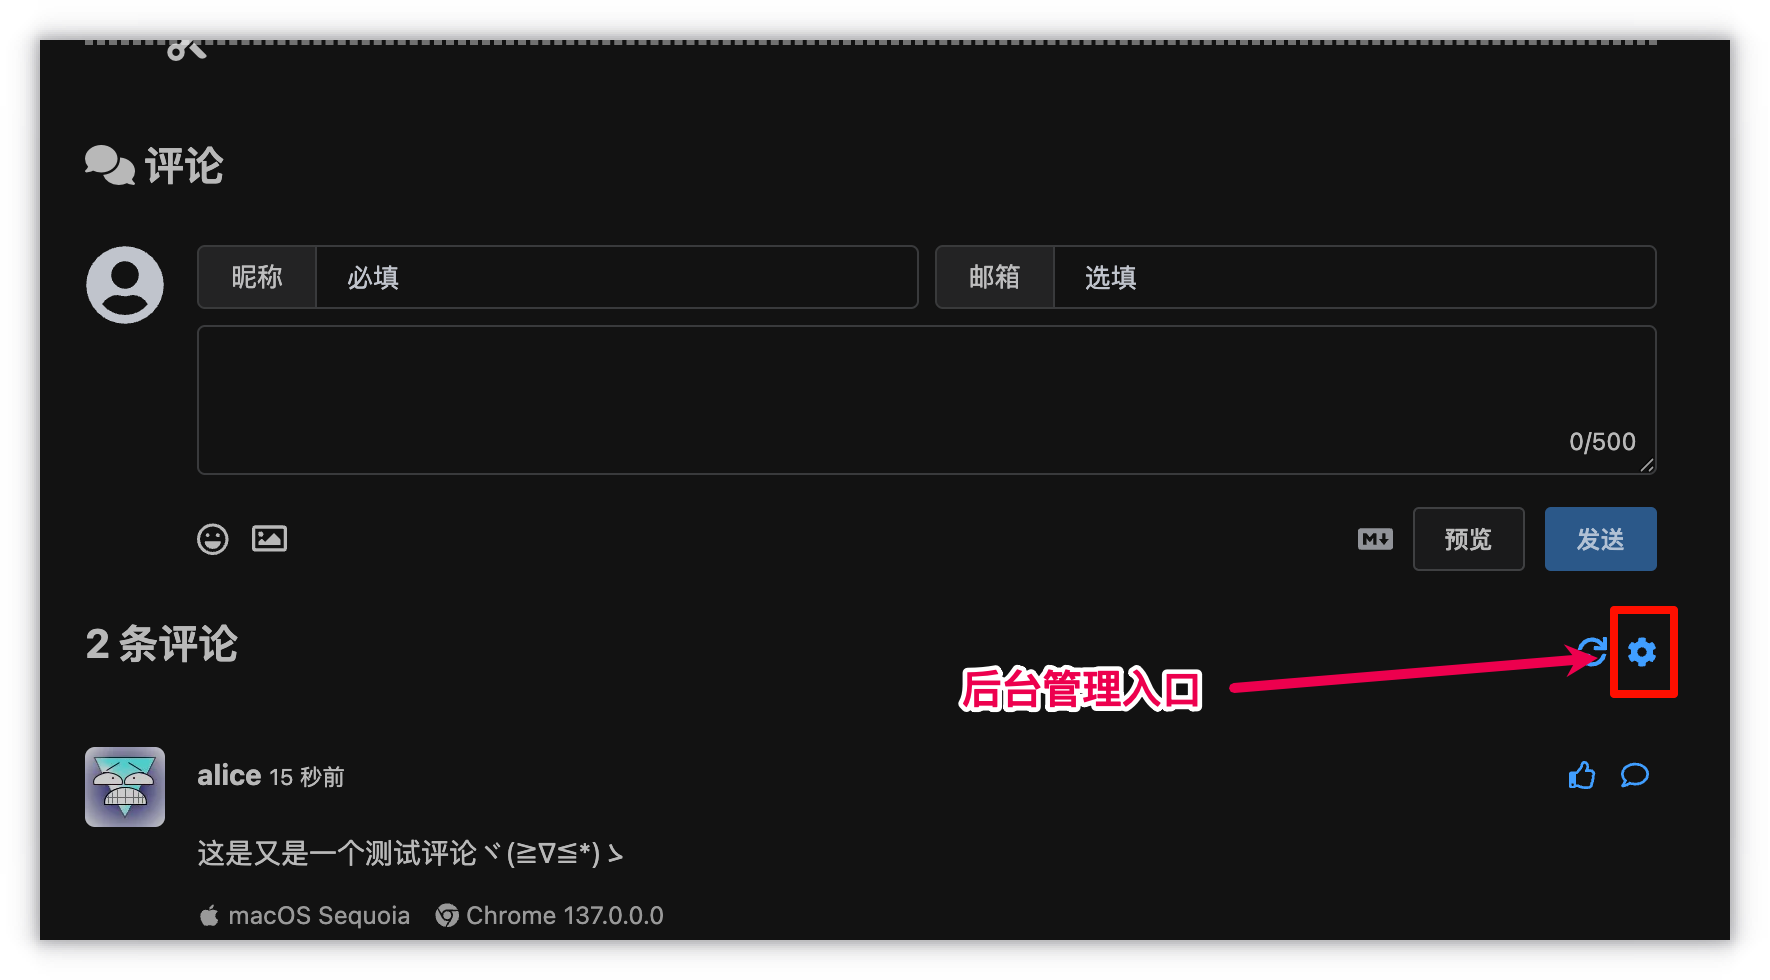
进入 Twikoo 管理后台,开始个性化配置
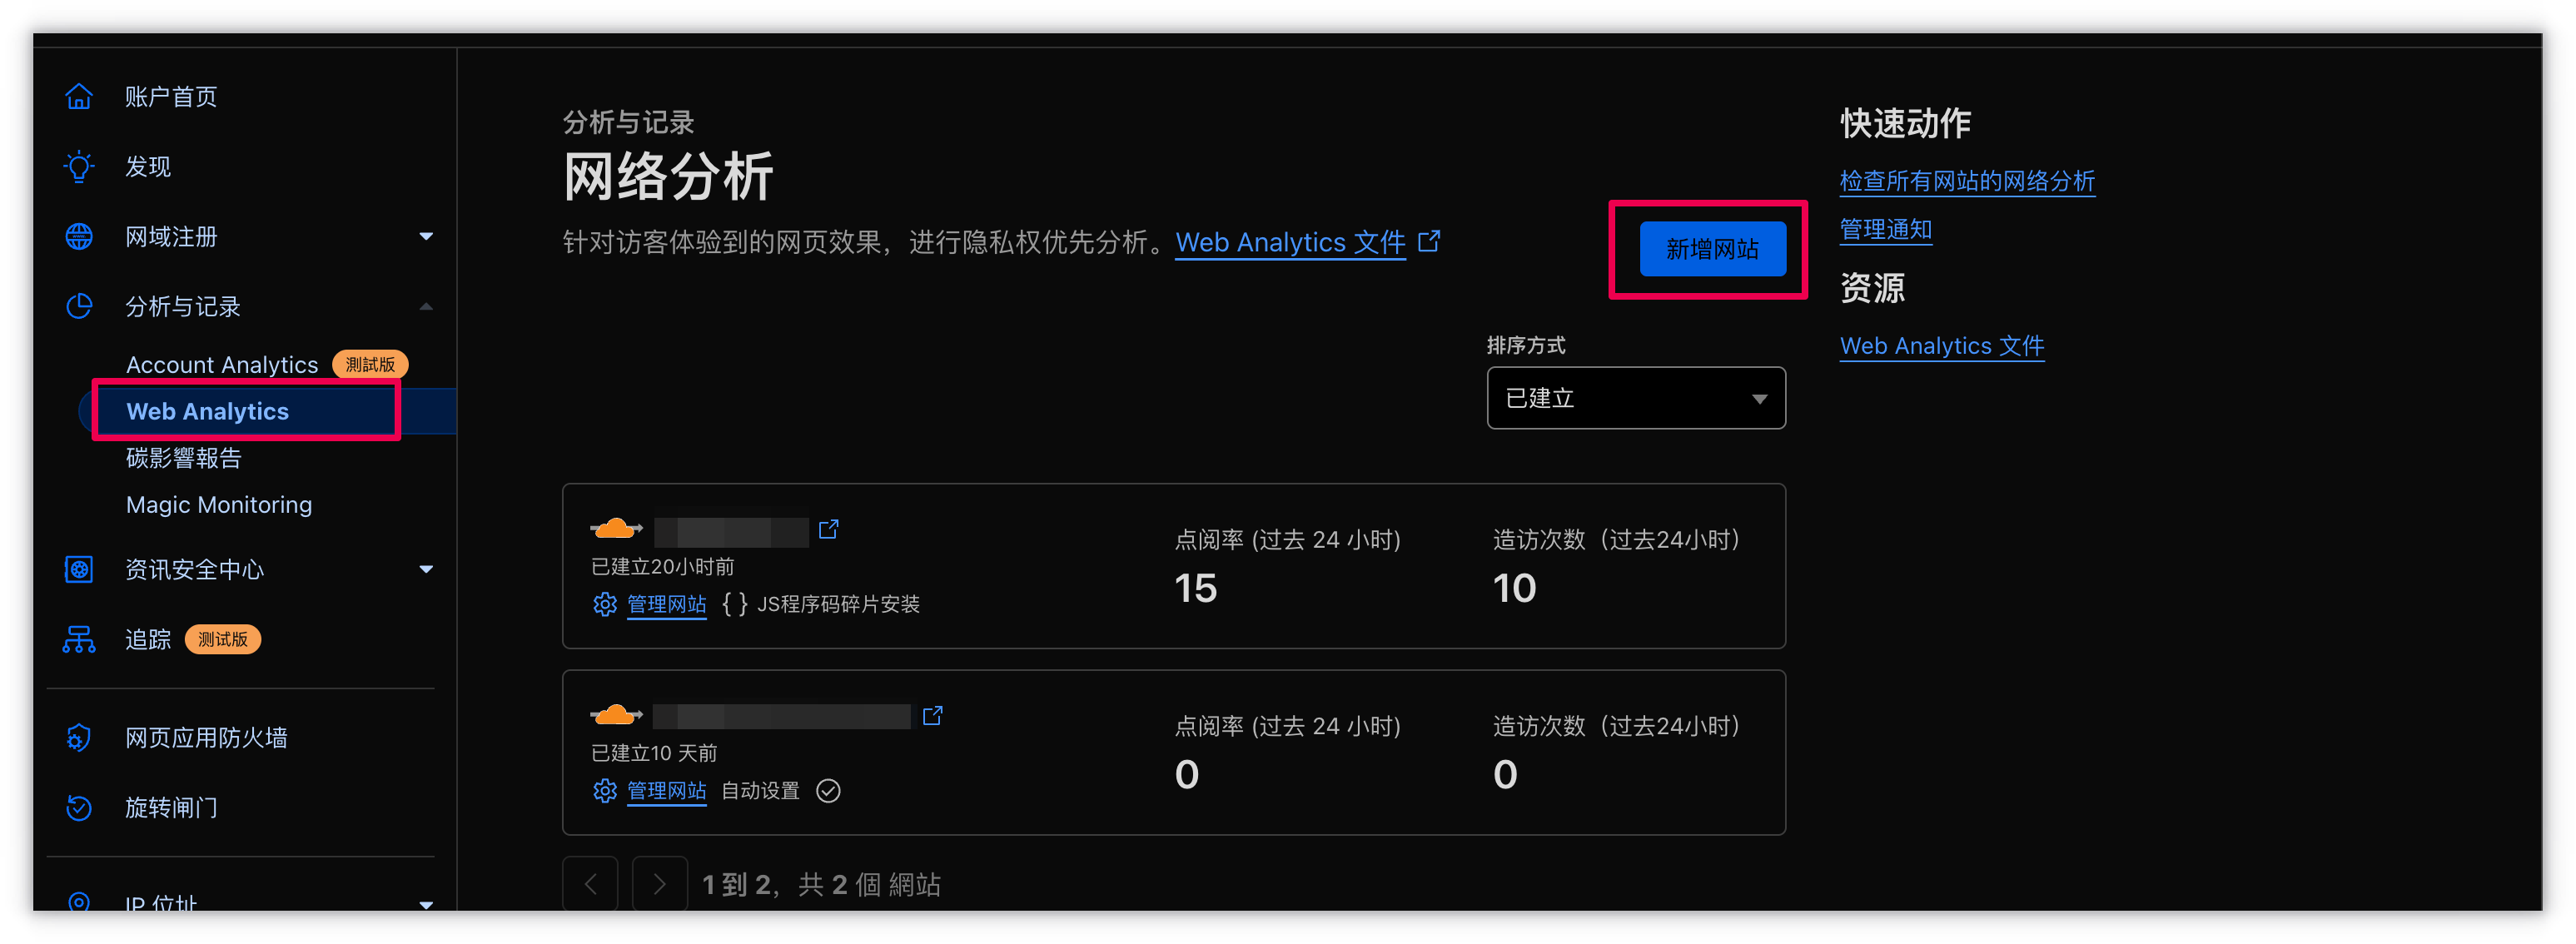
11、网站分析服务 笔者这里使用的赛博善人提供的网络分析服务
登录 cloudflare ,找到 “分析与记录” ,选择 Web Analytics
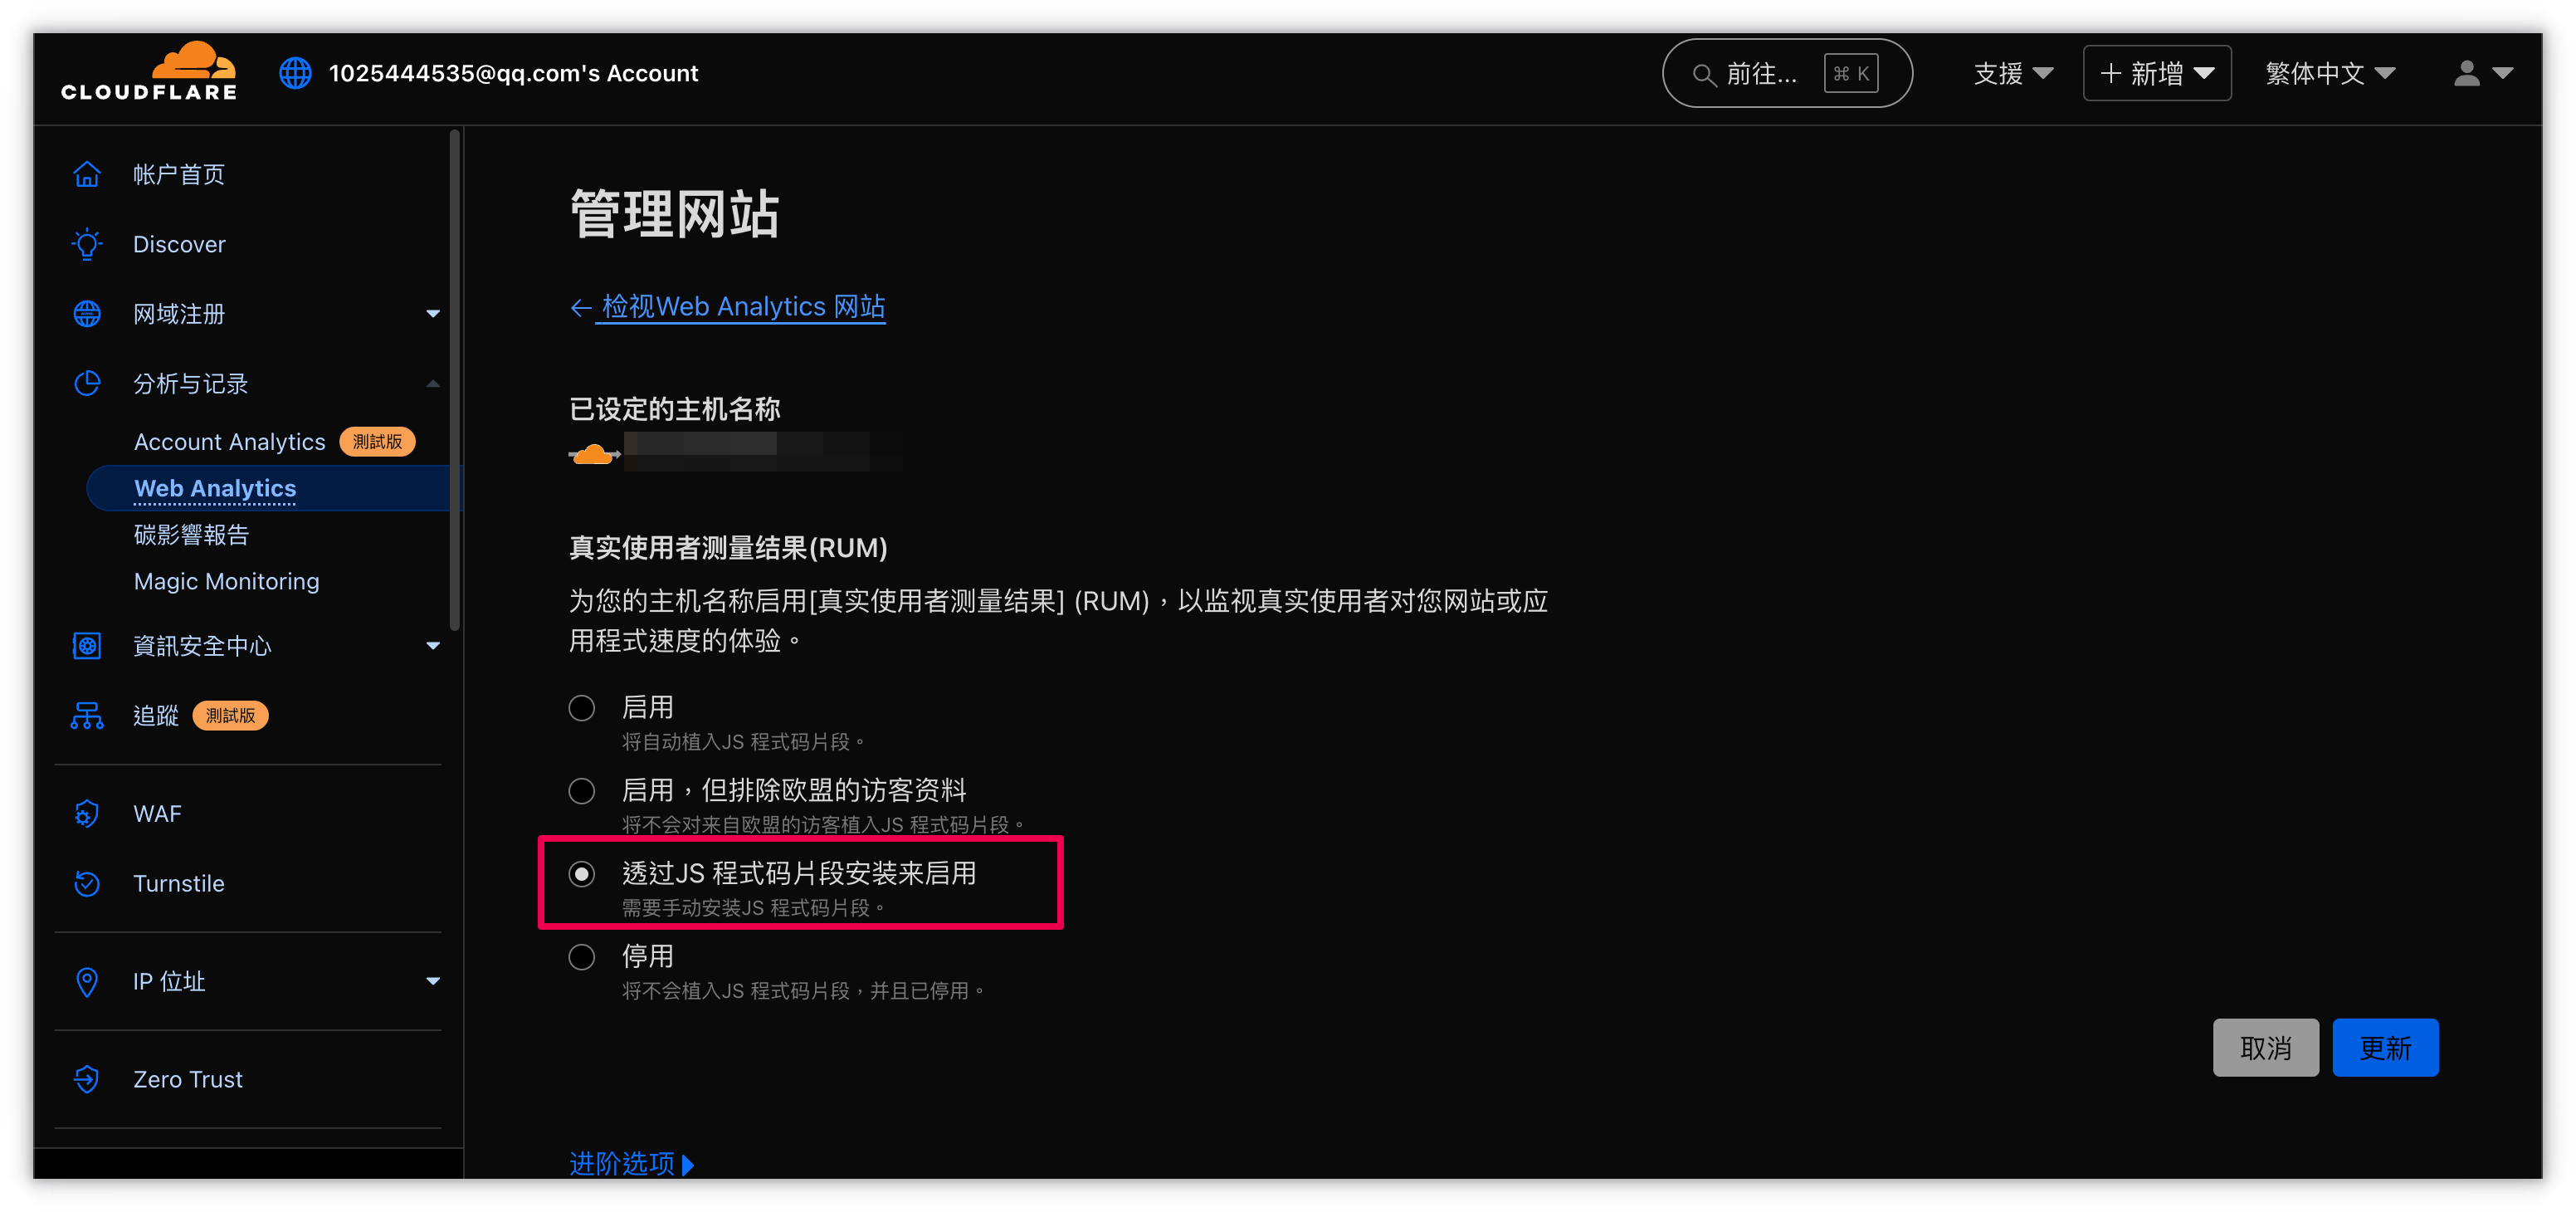
选择 新增网站,添加你的域名。添加完成后选择 管理网站,通过 JS 代码来安装启用
复制生成的 JS 代码中的 Token 值到主图配置文件 _config.butterfly.yml 1 cloudflare_analytics: 79bd1a2008ca43f1babbe3ec69e36dff
12、谷歌广告服务 进入谷歌广告 ,生成 AdSense 代码段,将 client 值填入主题配置文件 _config.butterfly.yml
1 2 3 4 5 6 google_adsense: enable: true auto_ads: true js: https://pagead2.googlesyndication.com/pagead/js/adsbygoogle.js client: enable_page_level_ads: true
13、图片大图查看模式 可配置 fancybox 或 medium_zoom 两种模式